
대부분 Jira에서 코드를 추적할 때는 Bitbucket이나 플러그인을 사용해 Git(GitHub, GitLab)과 연동해야만 이슈 티켓에서 CL(Change List 코드 변경 목록)을 볼 수 있는 것으로 알고 있다.
하지만 Perforce의 코드 검토 도구인 Helix Swarm을 사용하면 아래처럼 플러그인을 사용하지 않고도 이슈 티켓은 물론 Commit 및 수정 내역 등을 바로 확인할 수 있다. Helix Core의 확장웹 개념인 Helix Swarm을 설치하고 Jira와 연동하면 Git의 Pull request 와 같이 Pending – Shelve – Swarm Review – Submit 단계를 거칠 수 있다. 이뿐만 아니라 코드 Merge 등의 권한을 관리할 수 있고, 반드시 리뷰 후에 commit하도록 프로세스를 강제할 수도 있으며, 바뀐 코드의 diff check 기능도 사용할 수 있게 된다.
그럼 우선 Helix Swarm에 대해 알아보자.
1. Swarm 소개
💡Swarm이란?
Perforce 공식 사이트에 의하면 아래와 같이 정의할 수 있다.
|
Helix Swarm은 Helix Core를 위한 웹 기반 무료 코드 리뷰 도구입니다.
Helix Swarm을 사용하면 조직 프로세스를 준수하는 동시에 프로젝트를 빠르게 진행할 수 있습니다.
이 도구는 팀을 통합하여 더 효과적인 코드 리뷰를 수행합니다. 코드 리뷰 도구에서 파일을 공유하고, 검토자는 코멘트를 달고, 작업을 제안하고, 찬성 또는 반대 투표를 하고, 최종 작업을 제출합니다.
또한 Helix Swarm은 전체 동료 간 코드 리뷰 프로세스를 간소화합니다. 적절한 코드가 적절한 사람에 의해 제 시간에 리뷰되도록 할 수 있습니다. 이를 통해 코드 리뷰를 더욱 효과적으로 할 수 있어 차기 릴리스의 품질을 향상시킬 수 있습니다.
|
💡Swarm은 어떤 모습일까?
필자는 Helix Core를 서버에 구축하고 Swarm을 설치한 후 연동한 상태에서 Swarm의 코드 검토 기능 일부를 설명하고자 한다.

① Helix Core에서 Pending CL을 생성
② Pending CL을 Shelve로 이동
③ 신규 Swarm 리뷰를 요청
④ Swarm 페이지 확인
페이지에 들어오면 나의 코드 반영 부분과 이전 변경 사항을 비교할 수 있는 화면이 보이고, 언제 shelve가 만들어졌는지 확인할 수 있는 부분과 comment를 할 수 있는 부분 및 Jobs을 생성할 수 있는 부분이 보인다.
그리고 리뷰 절차에 따라 상태를 변경할 수 있는 Change Status 버튼이 보인다. 이러한 UI는 Bitbucket의 Pull request 후 리뷰하는 페이지와 흡사하다.
그리고 위 화면과 같이 코드 내의 comment도 인라인(in-line) 할 수 있다. Perforce의 사용성을 한층 업그레이드 해줄 수 있는 웹페이지가 확실한 것 같다.
2. Swarm 설치하기
💡Swarm 설치 해보기
공식 가이드에 따르면 Swarm은 Linux 서버에서만 설치가 가능하다.

<출처: https://www.perforce.com/manuals/swarm/Content/Swarm/chapter-setup_package.html>
따라서 Helix Core가 윈도우 서버라면 Swarm을 설치하기 위해선 Linux 서버가 하나 더 필요하다. Swarm 설치를 위한 준비사항을 간단히 살펴보자.
▶ PHP Version 8.0 이상
▶ Apache Web 서버4 이상
▶ Helix Core Server Extensions or Triggers 설치
그럼 중요사항은 알아 두었으니 설치를 진행해보자. Ubuntu 22.04기준으로 설치를 진행해보자.
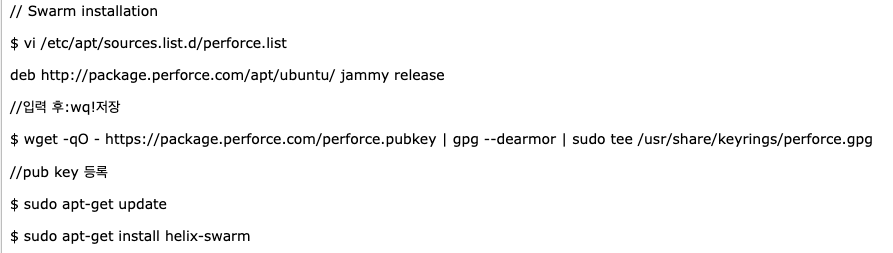
Package 설치로 비교적 설치는 쉽게 끝이 났다. 현재는 Helix-swarm-triggers보다는 Helix core server extensions 사용을 권장하고 있기 때문에 공식 홈페이지에 나온 helix-swarm-triggers설치는 생략한다.
$ sudo apt-get install helix-swarm-optional
//optional로 설치는 선택사항이고 설치하면 아래 기능을 사용할 수 있다.
|
스웜을 호스팅하는 서버에 스웜 옵션 패키지를 설치한다.필수는 아니지만, 이 패키지를 설치하면 이미지 매직 및 LibreOffice 스웜 모듈을 사용하는 데 필요한 종속성이 설치된다.이러한 모듈은 다양한 이미지 및 오피스 문서의 미리 보기를 제공한다.
|
이제 설치 후 Configuration을 진행해야 하는데 만약 SS0나 LDAP을 사용한다면 아래처럼 임시로 패스워드를 사용할 수 있도록 조치해야 한다.

$ sudo /opt/perforce/swarm/sbin/configure-swarm.sh
해당 쉘을 실행시키면 이제 Install을 구성하는 configuration이 실행된다. 이후 아래와 같이 진행한다.
Perforce가 설치된 p4port 입력 ( ip:port )
|
No P4PORT specified
Swarm requires a connection to a Helix Core Server.
Please supply the P4PORT to connect to.
Helix Core Server address (P4PORT):
-response: [myp4host:1666]
Checking P4PORT [myp4host:1666]...
-P4 command line to use: [/opt/perforce/bin/p4 -p myp4host:1666]
Attempting connection to [myp4host:1666]...
-connection successful:
Server address: myp4host:1666
Server version: P4D/LINUX26X86_64/2021.1/2179737 (2021/04/24)
Server license: 10000 users (support ends 2022/05/16)
Server license-ip: 192.168.0.1
|
Swarm 유저 등록
|
Checking Swarm user credentials...
No Swarm user specified
Swarm requires a Helix user account with 'admin' rights.
Please provide a username and password for this account.
If this account does not have 'admin' rights, it will
be set for this user.
Helix username for the Swarm user [swarm]:
//(comment)그냥 enter치면 됨. |
Swarm password 등록
|
-response: [swarm]
Helix password or login ticket for the Swarm user (typing hidden):
|
다른 shell을 열어 swarm user로 로그인 되는지 확인

Host가 있다면 host를 등록
|
swarm needs a distinct hostname that users can enter into their browsers to
access Swarm. Ideally, this is a fully-qualified domain name, for example
'swarm.company.com', but it can be just a hostname, for example 'swarm'.
Whatever hostname you provide should be Swarm-specific and not shared with
any other web service on this host.
Note that the hostname you specify typically requires configuration in your
network's DNS service. If you are merely testing Swarm, you can add a
hostname->IP mapping entry to your computer's hosts configuration.
Hostname for this Swarm server [myhost]:
|
Mail host 등록
|
Swarm can use a mail relay host to send email notifications. Leave empty if
you want to use the local mail handler (for example Sendmail, Postfix etc),
or enter a hostname (for example mx.yourdomain.com) to use a relay host.
Mail relay host:
|
.swarm depot을 등록 선택
|
swarm depot 등록 여부를 묻는다. 필자를 y를 선택했다. y를 선택하는 게 사용상 편리하다.
- checking depot
Swarm has the ability to store attachments against review comments. To
do this, it needs to have a depot where they are stored. By default,
this is //.swarm. We can create the depot for you automatically, and
set the protections on it to the following:
list user * * -//.swarm/...
admin user swarm * //.swarm/...
super user super * //.swarm/...
If you want to enable attachments, and for the depot and protections
to be set up for you, then say yes here. If you say no, then you can
still do this manually later.
Do you want to create a .swarm depot and set protections? (y/n) [n]
|
Server extension 사용 물음 답변
|
Do you want to use Swarm's Helix Core server extension?
Configuring Server extensions requires super user access to the Helix Server.
If you install the Swarm server extension, do not install the Swarm triggers.
Server extensions are supported for:
* Linux: Helix server 19.2 and later.
* Windows: Helix server 21.2 and later.
Use server extensions? Yes
|
3. Helix Core Server extension 설치하기
Helix Core Server extension 설치하기
<공식가이드 참조>
$ p4 extension --yes --install helix-swarm.p4-extension
$ p4 extension --configure Perforce::helix-swarm
|
ExtName: helix-swarm
ExtDescription:
Helix Swarm Extension
ExtVersion: 2022.1.DEV.20220120
ExtUUID: 4532BC59-7BC8-478F-ADF6-0A563C42563D
ExtRev: 1
ExtMaxScriptTime: unset
ExtMaxScriptMem: unset
ExtAllowedGroups:
ExtEnabled: true
ExtP4USER: sampleExtensionsUser
Name: helix-swarm
Owner: super
Update: 2022/01/21 10:43:46
Description:
The description of your config.
ExtConfig:
Debug:
2
Swarm-Secure:
true
Swarm-Token:
... SWARM-TOKEN
Swarm-URL:
http://localhost/
|
$ p4 extension --configure Perforce::helix-swarm --name swarm
|
ExtName: helix-swarm
ExtDescription:
Helix Swarm Extension
ExtVersion: 2022.1.DEV.20220120
ExtUUID: 4532BC59-7BC8-478F-ADF6-0A563C42563D
ExtRev: 1
ExtMaxScriptTime: unset
ExtMaxScriptMem: unset
ExtEnabled: true
ExtDebug: none
Name: swarm
Owner: super
Update: 2022/01/21 10:58:41
Description:
The description of your config.
ExtConfig:
depot-path:
//...
enableStrict:
true
enableWorkflow:
true
httpTimeout:
30
ignoreErrors:
false
|
여기까지 되었으면 http://swarmip로 swarm page에 접속이 되는지 확인해 본다. 만약 접속이 되지 않는다면 다음과 같이 점검해 본다.
① Apache 가 정상 구동되는지 확인 필요: 만약 apache가 실행되지 않은 상태라면 재실행 해줘야 한다.
② PHP 버전 확인 필요: php 8 이상 버전이 필요하기 때문에 php 버전 확인이 필요하다.
3. Swarm과 Jira 연동하기
💡Swarm과 Jira가 연동이 된다?
'Swarm과 Jira가 무슨 상관이 있지?'라고 의문을 갖는 분들이 많을 거라고 생각한다. Jira는 요즘 사용하지 않는 회사가 거의 없을 정도로 많이 사용하는 툴이기 때문에 오히려 연동이 안 되는 것이 이상하게 여겨질 수도 있을 것이다. 그럼 한번 연결을 해보자.
SWARM_ROOT/data/config.php 파일을 열어 아래 내용을 추가한다. JIRA Cloud라면 api token으로 password를 대체해야 한다.
|
// this block should be a peer of 'p4'
'jira' => array(
'host' => '', // URL for your installed Jira web interface (start with https:// or http://)
'api_host' => '', // URL for Jira API access, 'host' is used for Jira API access if 'api_host' is not set
'user' => '', // Jira Cloud: the username or email address used to connect to your Atlassian account
// Jira on-premises: the username required for Jira API access
'password' => '', // Jira Cloud: a special API token obtained from https://id.atlassian.com/manage/api-tokens
// Jira on-premises: the password or the Personal Access Tokens (PATs) required for Jira API access
'relationship' => '', // Jira subsection name links are added to defaults to empty, links added to the "links to" subsection
'ignored_users'=> array(), // Reviews or changes by users specified here are not linked to any Jira issue.
),
|
그리고 Swarm을 재실행한다. 그럼 이제 Jira와 연동이 되는지 테스트를 시작한다.
|
Jira의 Ticket ID

|
Perforce Comment

|
① 동일하게 파일 하나를 선택해서 Pending으로 만드는데 Jira의 Ticket Number를 찾아서 Comment에 넣어주자.

② 다시 Shelve에 넣어서 Swarm review를 실행한다. 티켓 번호에 링크가 생성된 결과가 보인다.

③ Description에 링크를 클릭한다. 링크를 누르면 Jira로 넘어가고 Jira 페이지에는 웹링크로 리뷰 번호와 현재 상태가 보여진다.

④ Swarm에서 Change state를 눌러 승인해준다. Jira의 상태가 'Approved'로 바뀐다.

⑤ Swarm에서 Commit 한다.
아래처럼 Commit 번호와 함께 Commit된 CL Number가 들어간다. 그리고 클릭하면 Swarm의 CL로 넘어가게 된다.

Perforce에서 동일한 74번 CL Number로 commit된 걸 확인할 수 있다.

4. 결론
지금까지 Helix Core extension을 통해 Swarm과 Jira를 연동하여 티켓을 모니터링하고 관리할 수 있는 방법을 살펴 보았다. 필자는 Helix Core와 Jira를 같이 사용하고 있는 고객을 상당히 많이 목격해왔다. 두 제품 간 연동 없이 이슈를 수동으로 Jira에 등록하고 관리하는 경우가 대부분이었다.
만약 Helix Core와 Jira를 함께 사용 중이라면 이제 Swarm과 Helix Core extension을 이용해서 더 편리하고 생산성 높은 작업 환경을 만들 수 있기를 바란다.
